A Work in Progress # 4.7: How to Replace a 1978 Fiat X1/9 Serie Speciale Speedo Cable
 |
| My two Fiats: Rosso the 128 3P project car (left) and Arancio the soon to be completed ex-UK Serie Speciale X1/9. |
 |
| Old cable (top left), newbie (right) and rear of instrument cluster showing the speedo drive (protuberance on the left) and three multi-pin wiring blocks. |

Rumour had it that replacing an X1/9's speedo cable is a bugger of a job, second only to brake and clutch master cylinder removal and reinstallation for its pain in the botty rating. The fact that my trusty Haynes manual doesn't even mention the procedure didn't inspire confidence, either!

It was, however, a job that I couldn't put off any longer, having bought a replacement from Vick Autosports, Texas, USA, nearly twenty months' ago (US$60, delivered). Time to stop being a mechanical girlie man!
To be honest, I really don't know what the fuss was about! It's actually very simple, as I'll explain:
First of all, I removed the instrument cluster (five Allen screws), disconnected the three multi-pin wiring blocks and checked that the speedo and cable connections were compatible, as there are some differences between the various models' fittings. No point proceeding if they don't match up!

 |
| The grommet above the right-hand side wiring block is where the cable enters the cabin from the frunk. |
The cable screws into the top of the gearbox on the car's left hand-side, as viewed from the rear*. It has a knurled ring that, in this case, needed some minor persuasion from a set of slip-pivot pliers to undo.
* All subsequent references to left will follow this convention.
 |
| Looking down into the engine bay, the cable comes from the gearbox and goes towards the front of the car (top of image). |
 |
| View from firewall, looking rearwards, again showing the cable connection on the gearbox. Once the the cable was released from the gearbox, I followed it towards the front of the car and down through a firewall-mounted bracket with a split grommet on it. I removed the grommet, fed the head of the cable through the hole first, before angling the knurled ring so that it could also slip out of the bracket. |
 |
| Cable and firewall-mounted bracket with the car's front to the left of image and the engine / gearbox to the right. |
The cable then runs along the external left side of the cooling / heater pipes tunnel, secured by four plastic clips, and up and through another split grommet into the right hand side (medial aspect) of what, in my right hand drive car's case, is the underside of the passenger's side floor well. All that's required is to get under the car - I used a creeper trolley - and to pull down on the cable, releasing it from the clips before getting into the car, prising open the grommet and pulling the cable into the cabin.
 |
| Clips and cable on left side of heater pipe tunnel (only one of my clips is white). |
 |
| The clips are open at the bottom, allowing the cable to be pushed up into, and held into place, by two short arms or prongs. |
 |
| Front right corner of the left side floor-well, showing the orifice where the cable enters the cabin from under the floor. |
 |
| Cable, in situ, secured by the grommet. Note the angle; this matters when replacing the grommet. |
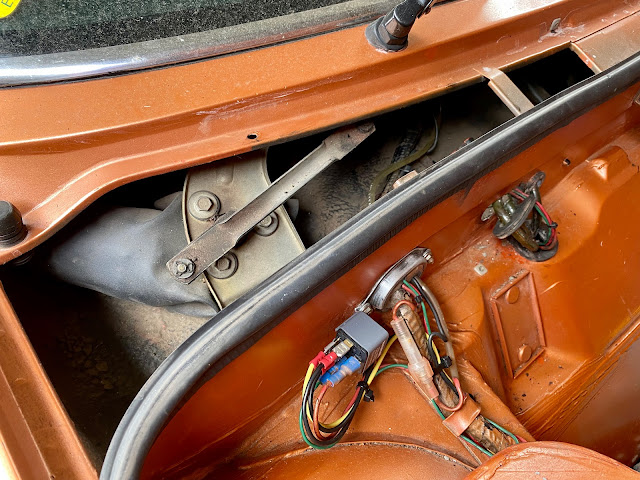
Next, the cable heads behind some of the wiring loom and heater hoses, under the dashboard (too tight for photos!), and up through another grommet, where it briefly emerges into the front luggage compartment (frunk), directly in front of the steering wheel. Rather than risking damage to the wiring or heater hardware, I removed the black plastic cover on the luggage compartment side of the front bulkhead and pushed the cable upwards from inside the cabin until it was free of potential snags, then pulled it the rest of the way from inside the frunk.

 |
| The speedo cable is routed through the left hand grommet with three apertures and, in this case, is visible behind the one green and two red wires. |
As a final check, I compared the lengths of the new and old broken cables and, finding them to be the same, fitted the former in reverse order to what's been described above. This was a good opportunity to take some of the slack out of the cable where it wasn't needed and to add this to the instrument cluster end, allowing more wriggle-room so that I could reconnect the three wiring blocks more easily.
Some care is needed when refitting the split grommet in the passenger's floor well; it's angled to suit the topography of the floor and must be aligned properly. However, this isn't difficult if you're aware of the need to do so.


And, finally, I secured the highest arc of the cable in the engine bay, above where it mounts into the gearbox, with a cable tie against a cooling hose. It wasn't cable-tied before I removed it. However, it looked like it might flop about a bit and possibly bang on the radiator overflow bottle.

 |
| Ex-UK speedo with dual mp/h km/h calibrations. |
That's it. Simple! It's a bit tight under the car and it wouldn't have hurt had there been a bit more room to manoeuvre in the passenger's side and under the dash but, in the end, the whole process took about and hour, required no special tools and nothing greater than basic maintenance skills.
Did you enjoy this post? Do you like classic cars - especially Italian and Japanese marques? If so, why not take a look around the rest of the uppermiddlepetrolhead site, share or subscribe? You never know what you might find!
U M P H
(uppermiddlepetrolhead.blogspot.com.au.)
All iPhone images.


hey
ReplyDelete