Better Than Bought Ones: When Spares Are Too Rare, The Next Bit ...
Much to my annoyance, I am neither of the Project Binky duo. I have very, very basic skills (I can more or less file things that I've cut at not quite 90 degrees back to relatively square, hitting stuff with a hammer is within my scope and I know which way to turn a nut, bolt or screw to do it up or loosen it). My toolkit is commensurate with my abilities, which is to say that it's not comprehensive.
However, I am a big fan of the Dunning-Kruger Effect (https://en.wikipedia.org/wiki/Dunning%E2%80%93Kruger_effect) and its ability to explain why-T-F it is that I imagine I should even attempt to fix half the busted bits that I find myself tinkering with. As far as broad reaching, explain-nearly-everything theories go, D-K has it nailed!
 |
| This explains so much! |
According to Messrs Dunning and Kruger and their eponymous theory, I lack the basic cognition to realise that my confidence far, far outweighs my ability to fix munted stuff. So ignorance really is bliss!
Take the above window winder on my 1975 Galant hardtop, for example. My properly clever mate, Steve, fixed it about five years ago when the teeth wore so much that the cog attached to the winder handle started slipping and the window wouldn't go up. I managed to remove it from the car but it was Steve who disassembled the mechanism, welded new faces onto the teeth and filed them back into shape before greasing and putting the whole thing back together again. Wizardry!
 |
| This close-up shows the teeth that the winder-cogs engage with. The circular bits at 1, 5 and 8 o'clock are where the spot welds used to be. |
Steve did, however, warn me that he wasn't super confident that his spot-welding would go the distance, as he'd had to keep the heat down for fear of damaging the mechanism and maybe even setting the lubrication alight. It held together for a good while but then, as he predicted, one of the welds failed, causing the shaft to go out of alignment and the winder cogs to jam in the teeth.
 |
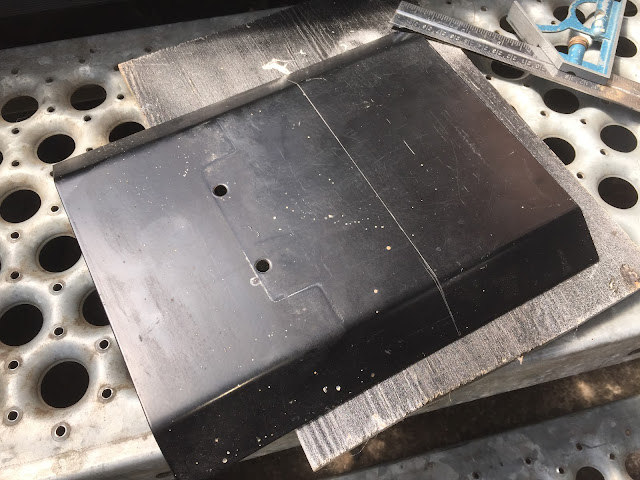
| A CD rack is a thing on which digital media were stored before the world converted to MP3s and MP4s. This was once the base of such an item and may well be considered to be an antique. |
I'm sure Steve would've had another crack at welding it back together. However, it seemed likely to me that if it had failed once, it would almost certainly do so again and I couldn't be bothered disassembling the door lining and extracting the mechanism, then reversing the entire tedious process more often than I absolutely needed to.
 |
| One repair plate crudely fashioned from an invaluable olde worlde CD rack. |
Enter an under-skilled, overly confident amateur with total faith that a bit of lateral thinking can overcome any problem! Can't weld? No problem; use nuts and bolts instead. Any concept of my own fallibility? Hell, no! Bob the Builder's got nothing on me!
 |
After quite a lot of contemplation and deliberation (read: How the xxxx do I fix this?), I put my $18, every-time-it's-worked-since-I-bought-it-for-a-one-off-job-has-been-a-bonus-angle-grinder to use to convert the base of a long-obsolete CD rack into a plate to hold the winder cog and its cover in place. Some filing, a bit of clamping-in-a-vice and banging-with-a-hammer-action soon produced the masterpiece you see above and below.
 |
| Above and below: plate before the 32 mm aperture and drill holes were made. |
A 32 mm hole was cut into the plate to accommodate the cover and shaft that attaches the window winder handle and the cog that meshes with the teeth that drive the rest of the mechanism. Some strategically placed holes were also drilled for the bolts to hold the plate firmly into position, doing the job of the spot welds.
 |
| Above and below: plate with 32 mm aperture, drill holes, and nuts and bolts added. |
I also had to ensure that the bolts protruding behind the plate, on the same side as the teeth, wouldn't foul the winder mechanism. This required a bit of filing but was achieved without too many problems.
 |
| A bit more filing was done after this photo was taken, allowing the crescent-shaped bit to rotate fully without fouling on any of the bolts. |
The result? Please pardon my Dunning-Krugeresque, hubristic over-confidence, but I reckon I've nailed it. The window winds up and down (bonus!), and seems very unlikely to fail again. A victory for those that don't know they can't fix things and therefore do!
U M P H
(uppermiddlepetrolhead.blogspot.com.au.)
All iPhone images.


Well done. An excellent example of making a plan when all else fails.
ReplyDeleteThat's gotta be 1/2 the fun, I reckon. It's also about the only way it was ever going to get fixed, 'coz there was next to zero hope of finding anew one. Cheers.
Delete